I'm writing various little tips and tricks guides for HaxeFlixel (since there's currently a gamejam on Newgrounds going on). This one is going to assume you've at least been through the basic tutorial on the HaxeFlixel website, so that you can display a sprite, and make it play an animation.
FLASH/ANIMATE SPRITESHEET GENERATION
Adobe Flash CS6 introduced a sprite sheet generator. Don't know what a sprite sheet is? Basically it's different frames of your animation all packed into a single file. While Flash/Animate is a VECTOR based program, it's all going to be exported as PNGs / RASTER essentially. You will NOT need to worry about smoothing vectors for better performance or anything like that.
Flash CS6 and above (Adobe Animate) have an inbuilt spritesheet generation tool. Actual flash project files (.fla) can be used as long as they're from a current or PREVIOUS version of flash. CS3 files work in Adobe Animate, Flash 8 files work in CS6, BUT CS6 files won't work in flash 8. You get the gist.
Don't have Adobe Animate or CS6? My suggestion is to 'acquire' either of them through similar means of how you 'acquired' that certain older version of Flash you have huh. Yeah I know you, nobody out here actually paying for Flash CS3 so come on hook yourself up with Adobe Animate while you're at it if you catch what I'm saying.
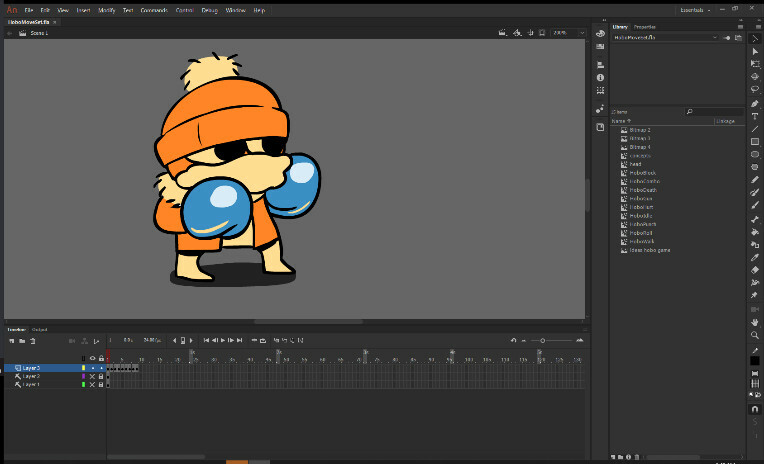
With that being said, I'm going to pop open a file in Adobe Animate. For this example I'll use assets from my game Boho In Baller Land, these specific art assets were made by my boy @Carmet so shoutouts lmaoo
WORKFLOW
- Make an animation of some sort (punching, walking, etc)
- Put the frames into a Movie Clip
- Export all the Movie Clips
Pretty simple workflow right? Let's walk through this with Boho the hobo. First, the animations are already made (thanks Carmet) so all we need to do is put them into a movie clip. Oh wait! Carmet did that too!
Artist who work in flash generally know their way around the software a bit, so I find in instances like this it's not too much to ask of your artist to organize different animations into separate Movie Clip files. Simplifies your life, and they were probably going to have a similar workflow anyways.
The animations are separated into different Movie Clip files now. In the LIBRARY window, you'll see a list of all of the movieclips.
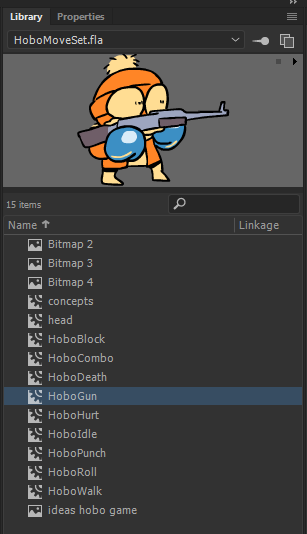
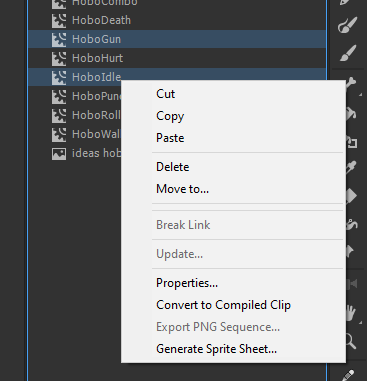
Let's say we want to export 'HoboGun' and 'HoboIdle' into a spritesheet. Hold CTRL and click on the Movie Clips you want (if you didn't know that hold CTRL trick, it works pretty much universally with most programs!). Now that you have the animations selected, right click on one of them, and select "Generate Spritesheet" from the dropdown
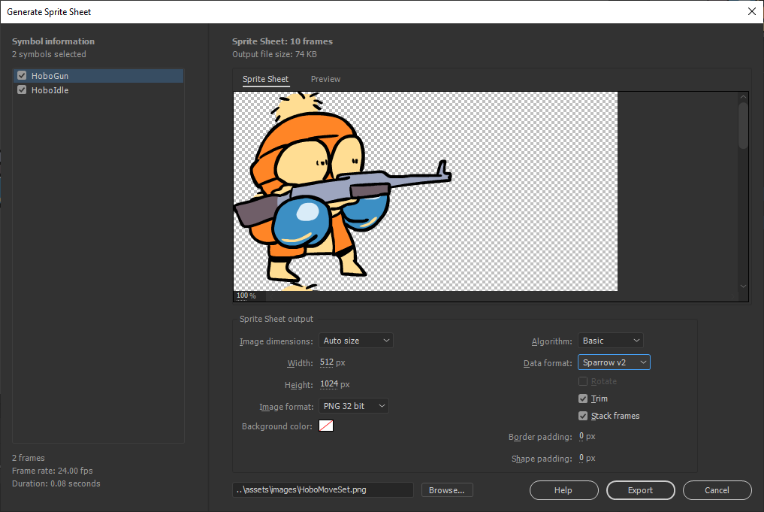
This should open up a new window of some sort. What you want is Image Dimensions to be on 'Auto Size'. You want Image Format to be in 'PNG 32bit', Algorithm to be 'Basic', and Data format to be 'Sparrow v2'. You also want the Trim and Stack Frames boxes checked. At the bottom of the window is where the image is going to be saved. Click on 'Browse...' to select a new location, probably your 'assets/images' folder in your HaxeFlixel project.
When you're ready press 'Export'
That should give you 2 FILES. One is the actual image file, and the other is the DATA file, the one thats a .xml file. If you open it up in Visual Studio Code, you might be looking at all this weirdo XML data that you don't understand how to use, don't worry about it you don't have to directly deal with it. We're going to be using an inbuilt HaxeFlixel function to parse it.
The tutorial on the HaxeFlixel website taught you that you can do loadGraphic() to load all your sprites right? Well that isn't the only way to load in your sprites.
Let's say we want to update our player graphic, in Player.hx (which extends FlxSprite). And let's say the code currently looks like this
loadGraphic('assets/images/player.png', true, 32, 32);
animation.add('idle', [0, 1, 2, 3, 4, 5], 30, true);
animation.add('gun', [0, 1, 2, 3, 4, 5], 30, true);
This isn't too bad right? HOWEVER when working with hand drawn animations in Flash, there can be a LOT of frames. Let's look at some code from when I was bad at coding and made Breathing Simulator with @BrandyBuizel
loadGraphic(AssetPaths.breathIn__png, true, Std.int(48670 / 62), 1038);

animation.add("idle", [0]);

//This is hell brandy why 60 fps ooof
animation.add("Inhale", [0, 0, 0, 0, 0, 0, 0, 0, 0, 0,
1, 1, 1,
2, 2, 2, 2, 2, 2,
3, 3, 3,
4, 4, 4,
5, 5, 5,
6, 6, 6,
7, 7, 7,
8, 8, 8,
9, 9, 9, 9,
10, 10, 10,
11, 11,
12, 12,
13, 13,
14, 14, 14,
15, 15, 15,
16, 16,
17, 17,
18, 18,
19, 19,
20, 20, 20,
21, 21, 21, 21, 21, 21, 21, 21, 21, 21, 21,
22, 22, 22, 22, 22,
23, 23, 23, 23, 23,
24, 24, 24, 24, 24,
25, 25, 25, 25, 25, 25, 25, 25,
26, 26, 26, 26, 26,
27, 27, 27, 27, 27,
28, 28, 28, 28, 28,
29, 29, 29, 29, 29,
30, 30, 30, 30, 30,
31, 31, 31, 31, 31,
32, 32, 32, 32, 32], 45, false);

//pause and shake frame 54
animation.add("Exhale", [33, 33, 33,
34, 34, 34,34, 34, 34,
35, 35, 35,35, 35, 35,
36, 36, 36,
36, 36, 36,
37, 37, 37,
37, 37, 37,
38, 38, 38,
38, 38, 38,
39, 39, 39,
39, 39, 39,
40, 40, 40, 40,
41, 41, 41,
42, 42, 42,
43, 43, 43,
44, 44, 44,
45, 45, 45,
46, 46, 46,
47, 47, 47, 47,
48, 48, 48, 48,
49, 49, 49, 49,
50, 50, 50, 50,
51, 51, 51, 51,
52, 52, 52, 52,
53, 53, 53, 53,
54, 54, 54, 54, 54, 54, 54, 54, 54,
55, 55, 55,
56, 56, 56,
57, 57, 57,
58, 58, 58,
59, 59, 59,
60, 60, 60,
61, 61, 61], 50, false);
As you can see, that was pretty hell to type all out by hand. And what if Brandy wanted to adjust some timings on part of the animation? Well you'd essentially have to retype and reorganize all that. Yuck. However with this spritesheet workflow, we are going to be able to smoothly integrate it in, while still having the ability to adjust the animation however needed, without having to refactor anything.
Let's go back to Boho
loadGraphic('assets/images/player.png', true, 32, 32);
animation.add('idle', [0, 1, 2, 3, 4, 5], 30, true);
animation.add('gun', [0, 1, 2, 3, 4, 5], 30, true);
this is going to be switched to this
var tex = FlxAtlasFrames.fromSparrow('assets/imagse/HoboMoveSet.png', 'assets/images/HoboMoveSet.xml');
frames = tex;

animation.addByPrefix('idle', 'HoboIdle', 24, true);
animation.addByPrefix('gun', 'HoboGun', 24, true);

animation.play('gun');
So let's walk through this line by line.
var tex = FlxAtlasFrames.fromSparrow('assets/imagse/HoboMoveSet.png', 'assets/images/HoboMoveSet.xml');
This line creates 'tex' variable which we will use as our texture. It can be called anything you want, but I stick with tex. It uses a function from the 'FlxAtlasFrames' class, fromSparrow() . This essentially takes all your data from your XML file, and uses it to slice up and organize your spritesheet into data that's usable with HaxeFlixel. This data is now in the same format as 'frames' which is a variable that EVERY FlxSprite object has. So since it's the same format, we simple just have to do
frames = tex;
easy.
To actually add animations, that looks like this
animation.addByPrefix('idle', 'HoboIdle', 24, true);
animation.addByPrefix('gun', 'HoboGun', 24, true);
we're still using 'animation' (which is another variable that every FlxSprite object has), but instead of using add() we are instead using the function addByPrefix(). To explain this let's go into our spritesheet's XML file.
<SubTexture name="HoboGun0000" x="0" y="0" width="292" height="255" frameX="-6" frameY="0" frameWidth="370" frameHeight="255"/>
<SubTexture name="HoboGun0001" x="0" y="255" width="370" height="251" frameX="0" frameY="-3" frameWidth="370" frameHeight="255"/>
The 'name' is what you called the MovieClip within FLASH, followed by 4 numbers, which are the current frame. What you want is the actual name of the animation. We'll use 'HoboGun' as an example for now.
animation.addByPrefix('gun', 'HoboGun', 24, true);
Instead of putting each and every frame number into an array as you might do normally, instead we are using this function to tell HaxeFlixel to read it's own data (which it got from the XML), and add ANY animations that start with 'HoboGun', into an animation. And that's it! The animation is ready to be used just as you would a normal animation!
animation.play('gun');
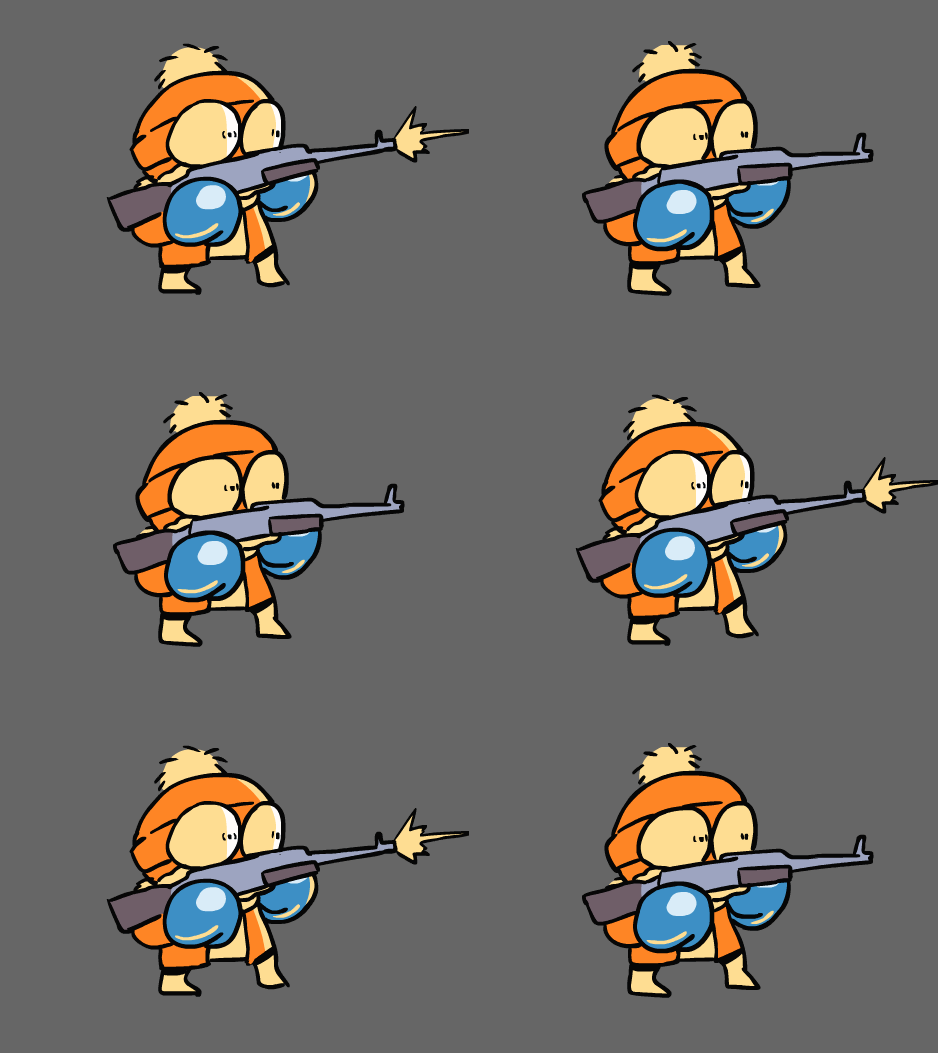
EPILOGUE: RESIZING
If you're sprite is bigger than you expected, you can resize it using the `setGraphicSize()` FlxSprite function. After you do this function though, you will also want to run 'updateHitbox()' and set 'antialiasing' to true.
setGraphicSize(0, 100);
updateHitbox();
antialiasing = true;
setGraphicSize() doesn't need both inputs to be used. If you put 0 in one of them, it scales the sprite uniformly across that axis. If the sprite graphic is 200x100, and we do
setGraphicSize(0, 10);
The new width will now be 20, and the height being 10. AND REMEMBER TO DO UPDATEHITBOX() OR ELSE UR SHIT GONNA BE SCREW-Y
To leave it off, here's an image that may or may not inspire you.
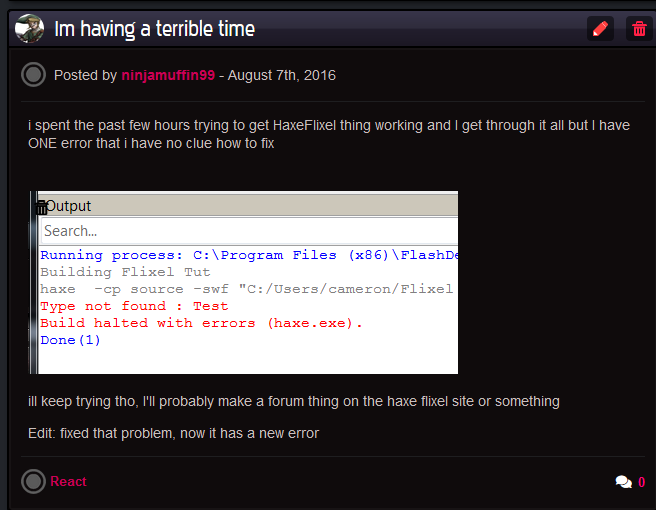
Here is my first experience with HaxeFlixel, almost 4 years ago. This was also pretty much my first experience with anything code related in general. It took me a solid day or so to figure out. At any point in that time I could have gotten so frustrated that I just gave up and moved onto a different framework. In the end I stuck through with HaxeFlixel, and now every game I make uses it, and it taught me a LOT about programming and game development. I would not have made the games I have, and then I probably would not have worked with the same people I have, if it wasn't for me following through with it and keep trying until I fixed my issue. Now get to coding, you still have a little over a month to make a game for the HaxeFlixel jam!
BrandyBuizel
Epic tut, may participate by making a small entry if i have time, this helps :)
ninjamuffin99
i gotchu gangster